Canon Orange Flashing Light

It flashed 11 times... what does that mean?

On certain Canon Inkjet printers they communicate their problems by flashing an orange light to let you know something is not quite right.
You have to watch the flashes, count them and then cross reference to establish why your printer is refusing to work.
To help you find the cause of your printer frustration we have compiled a list of what those flashes mean.
Don't blink though or you might lose count!
**
2 flashes
Meaning: the printer is out of paper / No paper.
Solution: Reload paper in the rear tray and press the Resume / Cancel button.
***
3 flashes
Meaning: the paper exit tray is closed / Paper jam.
Solution: the paper is jammed. Remove the jammed paper, replace the paper correctly in the printer, and then press the Resume / Cancel button.
****
4 flashes
Meaning: the tank cartridge is not correctly installed or has run out.
Solution: open the front panel, and then install the cartridge correctly.
Remove the cartridge, then put it back. Or install another cartridge if it is not recognized.
The cartridge chip may be defective.
*****
5 flashes
Meaning: the print head is not installed or defective.
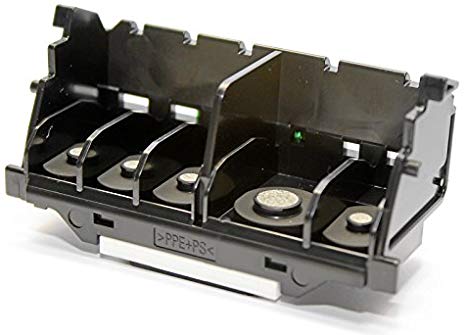
Solution: The print head is the block in which you install the reservoir cartridges for your printer.
An example of a 5-cartridge printhead below without the cartridges.

By lifting the lever on the left, you can then remove the print head.
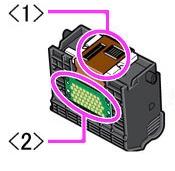
With a soft cloth and a little alcohol, clean part N ° 2 to remove any dust on the electrical contacts.

After reinstalling the print head and cartridges, if the fault persists, the only solution is to change the print head or change the printer.
As an indication, the value of a Canon inkjet printhead is around £65 ex vat. Contact your local Cartridge World store for a quote.
******
6 flashes
Meaning: the cover is open.
Solution: check that the hood is properly closed, that there is no gap or play, even slight.
*******
7 flashes
Meaning: the tank cartridge is not correctly installed.
Solution: remove the cartridge, then put it back. Or install another cartridge if it is not recognized.
The cartridge chip may be defective.
********
8 flashes
Meaning: waste ink tank is almost full.
If the following message appears, "End of life items or components, contact Canon Support" or "Waste ink tank is almost full or full".
In this case, the manufacturer limits the life of the printer with a maximum number of pages to print. This, even if the printer worked well and printed correctly just before the message appeared.
The solution consists in carrying out a manipulation to reset this used ink counter to zero.
Depending on your printer, there are different ways to reset the used ink counter.
Note: The ink pad also physically exists in the printer under the print head, and there is a high probability that this pad is saturated with ink.
Also, the printer is not waterproof, we advise you not to put it on a piece of furniture which could be damaged by ink running under the printer.
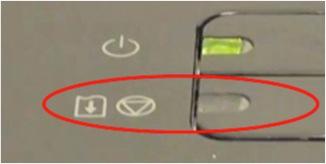
The "resume" button is a circle with an inner triangle pointing down:

CANON "S" SERIES PRINTERS:
Reset the counter for the ink tank.
Turn off the printer.
Press and hold the "resume" button, then do the same with the "power" button.
Release the "resume" button, then press twice on the same button, still holding the "power" button.
Release everything and wait until the green light stops flashing: the printer enters "service mode".
Press the "resume" button 4 times. The counter is then reset to 0.
CANON S200 PRINTER:
Take out the cartridges.
Disconnect the power cable.
Close the front cover.
Press the "Resume / reset" button and at the same time reconnect the cable.
Release the button.
Press the button again within 5 seconds and release it.
Press the button again for two seconds and release it.
Press the button again for two seconds and release it.
Disconnect the power cable to validate.
Reconnect the cable.
CANON I250, I255, I320, I350:
Turn off the printer and disconnect the usb cable.
Press and hold the "Power" button and turn the printer back on.
The LED must be green.
Press once on "resume", the light turns orange.
Press "resume" once again and the light is green.
Release the "Power" button.
Reconnect the power cable.
Open the printer configuration software and select the USB port.
Choose "Set detination 1" and reset to 1 must be done.
CANON I475D:
Turn off the printer.
Press on "Resume" then, without releasing, on "Power".
Leave "Power" pressed and release "Resume".
Press "Resume" twice and release the two buttons.
The green lights flash for a moment and then remain steady.
Then press "Resume" 4 times.
Press "Power" to turn off; if the printer does not turn off, press it again.
CANON PIXMA IP1000:
Disconnect the USB and power cable.
Open the cover and press "Power".
Reconnect the power cable.
Close the cover and release the "Power" button.
Download and install GeneralTool software.
Reconnect the cable.
Open GeneralTool.
Press ip1500.
Set Destination 1.
Select "Clear waste ink counter - Main".
Select "Clear waste ink counter - Plate".
CANON I850, I950, S600, IP5300:
The printer must be turned off.
Press "Resume" then "Power".
Release "Resume".
Press twice on "Resume", then release "Power".
Let the green light blink until the printer is ready.
Press 3 times on "Resume" and then on "Power to validate the reset to 0.
CANON S450:
The printer is turned off.
Press "Resume and then" Power "until it sounds" Beep ".
Leave power pressed and release "Resume".
Press "Resume" twice.
Release the "Power" button.
When the lights stabilize, press "Resume" 3 times. The light turns orange.
Press "Power" to confirm.
CANON BJC 1000 SERIE:
Take out the cartridge.
Disconnect the power cable.
Press "Resume".
Release "Resume" after reconnecting the power cable.
After 5 seconds press once on "Resume".
Press "Resume" for 2 seconds and release.
Again, press "Resume" for 2 seconds and release.
Disconnect the power cable to validate.
CANON BJC-2000, BJC-2100 SERIE:
Take out the cartridge.
Disconnect the power cable.
Close the front access panel.
Press and hold the "Resume / Reset" button and reconnect the power cable.
Release "Resume / Reset".
Press "Resume / Reset" once after 5 seconds.
Press "Resume / Reset" for 2 seconds and release.
Again, press "Resume" for 2 seconds and release.
Disconnect the power cable to validate.
CANON BJC-210, BJC-240, BJC-250, BJC-255, BJC-265, BJC-4100, BJC-4200, BJC-4300, BJC-4400, BJC-4550, BJC-4650:
Disconnect the power cable.
Press and hold the "Power" and "Resume" buttons.
Reconnect the power cable.
Let go of the buttons.
Open the printer front panel.
Press and hold the "Cartridge" and "Resume" buttons.
Press "Power".
Release all buttons after the beeps.
Press once on "Cartridge".
Press "Resume".
CANON BJC-5000:
Turn off the printer.
Press on "Resume" then on "Power", the lights will start to flash.
Then press "Resume" twice and wait until a beep indicates the service mode.
When the lights remain green, press "Resume" 4 times.
Press "Power" to confirm.
CANON BJC-5100:
Turn off the printer.
Press and hold on "Resume" then on "Power", the light will start to flash.
Then press "Resume" twice and wait for the beep.
When the lights stay green, press "Resume" 4 times.
Press "Power" to confirm.
CANON BJC-3000, BJC-6000, BJC-6100, BJC-6200, S400, S450, F300, F600, F620, BJC-7000, BJC-7100, BJC-8000, BJ-F800, I6500:
Turn off the printer.
Press "Resume" and, without releasing the button, then press "Power" until there is a beep or the green LED lights up.
Release "Resume" while holding down "Power".
Press Resume twice and release the two buttons.
When the lights stop blinking, press "Resume" 3 times. The indicator should be orange.
Press "Power" to confirm.
CANON BJC-8200:
Turn off the printer.
Press, without releasing, on "Resume" and then on "Power".
Drop "Resume" but leave "Power" pressed.
Press Resume twice and release the buttons.
When the lights stop blinking, press "Resume" 4 times. The indicator should be green.
Press "Resume once.
Press "Power" to confirm.
CANON BJC-50, BJC-55, BJC-80, BJC-85, M40, M70:
Disconnect the power cable.
Press "Power" and "Resume".
Reconnect the cable.
Release the buttons once the printer has restarted.
Press "Cartridge" and "Resume".
Press "Power".
Release all buttons after the beeps.
Press "Cartridge" 16 times.
Press "Resume".
Disconnect the power cable.
CANON BJ F900, F890, F700, F500, S900, S820, S750, S520:
Turn off the printer.
Press and hold on "Resume" then do the same with "Power".
Release "Resume" and press 2 times on "Resume" still keeping "Power" pressed.
Relax everything.
Press 4 times on "Resume".
Press "Power" to confirm.
Press "Power" again to turn off the printer.
CANON S300, S400, I550, I560, I850, I860, I865, I9100, I9950, PIXMA IP2000, PIXMA IP3000:
Turn off the printer.
Press "Resume" then "Power".
Release "Resume". Press twice on "Resume" and release the two buttons.
When the lights stop flashing press 4 times "Resume".
Press "Power" so that the printer turns off. If not, press again.
CANON S900, S820, S750, S520:
Turn off the printer.
Press and hold "Resume", then press and hold "Power".
Release "Resume" and press twice on it.
The printer is in service mode.
Release the "Power" button.
Press 4 times on "Resume".
Press "Power" to confirm and again "Power" to restart the printer.
CANON S9000:
Turn off the printer.
Press and hold "Resume" then "Power".
Release "Resume".
Press twice on "Resume" and release the two buttons.
When the lights stop flashing press 4 times "Resume".
Press "Power" to turn off the printer.
CANON PIXMA IP4000, IP4200, IP5200, IP6000, IP8500:
Turn off the printer.
Press "Resume / Cancel" and at the same time press "Power".
Release "Resume / Cancel" and press twice on "Resume / Cancel".
Release the two buttons.
Press 4 times on "Resume".
Press "Power" to confirm.
CANON MPC190, MPC200:
Press: Menu, Copy, Scan, Copy, Copy.
Select Test Mode.
Select 8 - "Printer test in Test Mode".
Select 3 - "EEPROM CLEAR".
Select 0 - "INK COUNT".
Press the "Set" key.
Press the "Stop / Reset" button then press "On / Off".
CANON PIXMA MP110:
Enter "Service Mode" by successively pressing the Menu-Scan-Copy-Scan keys.
Go to "NVRAM" with the arrows then press "OK".
Go to "CMY ink level" with the arrows then press "OK".
Select "1" then press "OK".
Go to "K ink level" with the arrows then press "OK".
Select "1" then press "OK".
Press "Reset" (triangle in a red circle).
If the procedure does not work, apply the one below from the MP130.
CANON PIXMA MP130:
Turn on the printer.
Press: Menu -> Scan -> Copy -> Scan.
"SERVICE mode": go to "NVRAM ACCESS".
Set "ABS-M LEVEL" to 0.
Set "ABS-P LEVEL" to 0.
Press "STOP" to exit.
CANON S9000:
Turn off the printer.
Press and hold "Resume" then "Power".
Release "Resume".
Press twice on "Resume" and release the two buttons.
When the lights stop flashing press 4 times "Resume".
Press "Power" to turn off the printer.
CANON PIXMA MP150, MP160:
Turn off the printer.
Press "Power" and at the same time press "Stop / Reset".
Release "Stop / Reset" and press twice on it.
Release the two buttons.
When the "on / off" lights are green, press "Stop / Reset" 4 times.
Turn off the printer and turn on again.
CANON PIXMA MP180:
Turn off the printer.
Press "Power" and at the same time press "Stop / Reset".
Release "Stop / Reset" and press twice on it.
Release the two buttons.
Wait 20 to 30 seconds until the screen marks "Canon Idle".
Press "Stop / Reset" 4 times.
Press twice on "Power".
Turn the printer off and on.
CANON PIXMA MP450:
Turn off the printer.
Press on "Resume / Cancel" (red triangle in the circle) and at the same time on "Power"; the green light comes on.
Release "Resume / Cancel" while keeping "Power" pressed.
Press "Resume / Cancel" twice and release the two buttons.
When the green button lights up, press "Resume / Cancel" 4 times.
Turn off the printer and turn on again.
CANON IP1200, IP1600, IP2200:
Download this little program: GeneralTool.
Unzip the file.
Launch "GeneralTool.exe".
Select the correct USB port for the printer.
Click on "Lock release" then select the model in "Set destination".
In "Clear waste ink counter", select "Main" to reset the ink counter.
CANON MP400, MP700, MP730, MP600, MPC400:
Enter service mode, by pressing "menu," copy "and" # ".
Select "Test mode".
Select 8 - "Printer test in test mode".
Select 3 - "EEPROM clear".
Select 0 - "Ink count".
Press the "OK" key.
Press the "Stop / Reset" button and then "On / Off"
CANON SMARTBASE MP360, MP370, MP390:
Enter Service Mode: to do this press the black button with a star, followed by, "scan", "copy", "scan".
Select "Test mode" by pressing the right arrow 13 times.
Select 8: "Printer Test".
It will be marked "- 8-2 +" press the right arrow once to have "- 8-3 +" press "OK".
Select 0: "Ink Count".
Press "OK".
This should revert to "8: Printer Test - 8-3 +".
Press the "Stop / Reset" button to return to step 3.
Press the "On / Off" button.
CANON MP140, MP160, MP170, MP180, MP210, MP220, MP460, MP470, MP500, MP510, MP530, MP600, MP610, MP800, MP820, MP810, MP830, MP960, MP970:
Turn off the printer.
Press the "Resume" button (red circle in the triangle), and, without releasing, press "Power".
Release the "Resume" button.
Without releasing the "Power" button, press "Resume" twice and release the two buttons.
Press "Resume" four times. Press power to confirm.
Press "Power" again to restart the printer.
CANON PIXMA MP520:
Turn off the printer.
Press buttons N ° 1 + 2 + 3 and 4 without releasing them.
Leave to press for 10 seconds.
Release the "On / Off" button (No. 4), always letting the others press.
After a few seconds, when the printer turns on, release the three buttons.
CANON PIXMA MP750, MP760, MP780:
Press successively on: Menu, Scan, Copy, Scan.
Select "Test mode".
Select 8 "Etc .."
Select 4 "EEPROM CLEAR".
Select 1 "Ink Count".
Turn off the printer and turn on again.
CANON IP1300, IP1700:
Turn off the printer.
Press and hold "Resume" then press "Power".
Leave "Power" pressed and release "Resume".
Press twice on "Resume" and release the two buttons; wait until the green light stops flashing.
Press "Resume" 4 times and press "Power" to restart the printer.
CANON MX700:
Turn off the printer.
Press and hold the "Stop / Reset" button, then press and hold the "On / Off" button
Keeping "On / Off" pressed, release "Stop / Reset", then press twice on it.
Release the two buttons.
When the Power LED is green, press "Stop / Reset" 4 times.
Press "On / Off", press "Stop / Reset" twice.
Press "On / Off" again to turn off the printer.
*********
9 flashes
Meaning: The printer has no response from the digital camera.
Solution: problem not related to cartridges, see your manual.
**********
10 flashes
Meaning: can not print on both sides.
Solution: problem not related to cartridges, see your manual.
***********
11 flashes
Meaning: Automatic alignment of the print head has failed.
Solution: press the "resume / cancel" button to restart the printer.
*************
13 flashes
Meaning: The ink level of the cartridge cannot be detected.
Solution: the light should be solid red to indicate that the tank cartridge is recognized. If not, remove the cartridge, then put it back. Or install another cartridge if it is not recognized.
**************
14 flashes
Meaning: the tank cartridge cannot be recognized.
Solution: remove the cartridge, then put it back. Or install another cartridge if it is not recognized.
The cartridge chip may be defective.
***************
15 flashes
Meaning: the tank cartridge cannot be recognized.
Solution: remove the cartridge, then put it back. Or install another cartridge if it is not recognized.
The cartridge chip may be defective.
****************
16 flashes
Meaning: the cartridge has run out.
Solution: if the light corresponding to the cartridge is not solid red, then it is probably necessary to replace the cartridge.
